
NURBS adalah standar industri alat untuk perwakilan dan desain geometri [Rogers]. Some reasons for the use of NURBS are, that they: [PIEGL][ROGERS] Beberapa alasan penggunaan NURBS adalah, bahwa mereka: [PIEGL] [Rogers]
menawarkan satu bentuk matematika untuk kedua, standar analisis bentuk (misalnya Conics) dan bebas berupa bentuk;
memberikan fleksibilitas yang besar untuk merancang berbagai bentuk;
dapat dievaluasi oleh angka cukup stabil cepat dan akurat algorithms;
invariant adalah di bawah affine serta perspektif transformasi;
generalizations adalah non-rasional B-splines dan non-rasional dan rasional Bezier Curves dan permukaan.
Namun, salah satu drawbacks NURBS ada, adalah perlu untuk penyimpanan ekstra untuk menentukan bentuk tradisional (misalnya lingkaran).Ini hasil dari parameter di samping kontrol poin, namun akhirnya mengizinkan dikehendaki fleksibilitas untuk menentukan bentuk parametric. NURBS-bentuk ini tidak hanya ditentukan oleh titik kontrol; bobot, yang berhubungan dengan setiap titik kontrol juga diperlukan. curve C (u), sebagai contoh, yang merupakan nilai-vector piecewise rasional jumlahnya banyak fungsi, didefinisikan sebagai: [PIEGL]
Rabu, 25 Februari 2009
NURBS_subD modeling
topologi ketua subD modeling


This is a summary of this thread http://64.233.189.132/translate_c?hl=id&sl=en&u=http://forums.cgsociety.org/showthread.php%3Ff%3D25%26t%3D38469&prev=/search%3Fq%3DSUB%2BD%2BModeling%26hl%3Did%26sa%3DX&usg=ALkJrhg-cTyWXXrTk4a7_TEvGQXC3kT7CA in my interpretation. Ini adalah ringkasan ini thread http://64.233.189.132/translate_c?hl=id&sl=en&u=http://forums.cgsociety.org/showthread.php%3Ff%3D25%26t%3D38469&prev=/search%3Fq%3DSUB%2BD%2BModeling%26hl%3Did%26sa%3DX&usg=ALkJrhg-cTyWXXrTk4a7_TEvGQXC3kT7CA dalam interpretasi. I tried to make it short and practical. Saya mencoba untuk membuat pendek dan praktis. You can of course add your comments about how to improve the material. Anda tentu saja dapat menambahkan komentar Anda tentang cara untuk meningkatkan materi. I'm not the author of the material (it is Stahlberg mainly and others), but I think it may be helpful to some people. I'm not penulis materi (it is Stahlberg terutama dan lain-lain), tapi saya rasa ini mungkin membantu untuk beberapa orang. The original thread lost many images, and is too flooded in my opinion. Asli thread kehilangan banyak gambar, dan terlalu banjir pendapat saya. The artist Stahlberg ( http://64.233.189.132/translate_c?hl=id&sl=en&u=http://www.androidblues.com/&prev=/search%3Fq%3DSUB%2BD%2BModeling%26hl%3Did%26sa%3DX&usg=ALkJrhgAkyMTiAKFXWV8JpOfY7lOIQdjZA ) kindly agreed for using his images he made for explainig the original material. Artis Stahlberg (http://www.androidblues.com) hormat sepakat untuk menggunakan gambar yang dibuat untuk dia explainig bahan yang asli. Thank you, Stahlberg. Thank you, Stahlberg. There are others artists images as well. Ada foto artis lain juga. Actually you may consider that the author of this thread is Steven Hägg-Ståhlberg. Sebenarnya Anda bisa mempertimbangkan bahwa penulis ini benang Steven Hägg-Ståhlberg. Currently the thread is under development, illustrations will be added. Saat ini, benang yang sedang dikembangkan, ilustrasi akan ditambahkan. There's no perfect topology, it is definitely a game of research and development as it is a simplification of form. Tidak ada topologi sempurna, ia pasti permainan penelitian dan pengembangan ini adalah sebagai bentuk penyederhanaan. It’s good to understand how muscles work under the skin and how fat and bones crease and wrinkle up the skin at the top.(pic1) Ada baiknya untuk memahami cara kerja otot di bawah kulit dan lemak dan tulang berlelah dan kerut pada kulit di bagian atas. (Pic1) 1. 1. First draw loop lines over the 2d sketch(pic2) Menarik loop baris pertama melalui 2d sketsa (pic2) 2. 2. Then pick up a mirror, study your face and make facial expressions you need. Kemudian mengambil cermin, kajian wajah dan membuat ekspresi wajah yang Anda butuhkan. Make shots if you can. Membuat gambar jika Anda bisa. (pic3) (pic3) 3. 3. Try to make them with your topology. Coba untuk membuat mereka dengan topologi. Compare with reference wires. Bandingkan dengan acuan kawat. Rework it, try again. Mengolah lagi, coba lagi. Make the tests and see if you have enough polycounts for good facial expressions. Melakukan tes dan melihat apakah Anda sudah cukup baik untuk polycounts ekspresi wajah. You can try doing morphtargets in zbrush. Anda dapat mencoba melakukan morphtargets di zbrush. Beware of long polygons. Awas panjang polygons. You have to form an even balance of poly distribution, as you may get tearing and shearing.(pic4) Anda diharuskan untuk membentuk sebuah bahkan keseimbangan poly distribusi, karena dapat mendapatkan cemerlang dan pencukuran. (Pic4) The loop distance and shape differs with each person, though the underlying topology is similar. Lingkaran jarak dan bentuk berbeda dengan setiap orang, namun topologi yang sama. The beautiful, pronounced, anatomically correct form is an important factor. Yang indah, diucapkan, adalah bentuk anatomically benar faktor penting. Even the topology may be wrong, but if the model is static, it may look convincing and fascinating.(pic4b) Topologi bahkan mungkin salah, tetapi jika model yang statis, mungkin terlihat menarik dan meyakinkan. (Pic4b) The next step is correct topology for animation. Langkah selanjutnya adalah benar untuk topologi animasi. The question is: what kind of details we need for the form and animation? Pertanyaannya adalah: apa saja yang kita butuhkan untuk rincian bentuk dan animasi? Important details: Penting adalah: 1. The corners of the mouth should not be one thin line – at least 2 edges forming the corner. 1. The sudut mulut tidak boleh satu garis tipis - setidaknya 2 Tepi membentuk sudut. In most wires I see 3 edges -one horizontally and one above and below.(pic5) Dalam kawat paling ujung-ujungnya saya melihat 3 horisontal dan satu-satu di atas dan di bawah ini. (Pic5) 7. The little wrinkle at the corner of the mouth - sometimes overlooked. 7. Yang sedikit kerut di sudut mulut - kadang-kadang lebih. In many old people it does seem to cross the nasolabial fold.(pic6) Dalam banyak orang tua yang sepertinya tidak menyeberangi nasolabial lipat. (Pic6) 2. The number of subdivisions of the upper and lower lips and eyelids should be the same to avoid problems with animation.(pic7) 2. Jumlah subdivisi dari atas dan bawah bibirnya dan eyelids harus yang sama untuk menghindari masalah dengan animasi. (Pic7) 3. The corners of eyes have a special fold – the upper lid goes above the lower. 3. Sudut matanya ada khusus flip - yang berjalan di atas kelopak mata atas bagian bawah. (pic8) (pic8) 4. The wrinkles at the corner of the eyes - very hard to get right if the topology is wrong. 4. Keriput di sudut mata - sangat sulit untuk mendapatkan hak jika topologi salah. I think it’sa good idea to add them aa local detail not to make the mesh to dense. I think It'sa good idea untuk menambahkannya detail aa lokal tidak membuat lubang ke padat. I’m not sure whether the circular topology is more logical there to the lines going to the skull base.(pic9) Saya tidak yakin apakah circular topologi lebih logis ke sana pergi ke baris base tengkorak. (Pic9) 5. The contour of the cheekbone must be defined by the direction of edges - runs from the temple to just below the nostrils (not all the way to them but in that direction).(pic10) 5. The garis tulang pipi yang harus ditetapkan oleh arah Tepi - berjalan dari candi hanya di bawah nostrils (tidak semua jalan kepada mereka, tetapi pada arah). (Pic10) 6. The nose-ridge - the bridge of the nose displays this surface shape in some people, and I believe we all have the same structure there, just many of us (like asians) don't show it. 6. The hidung-ridge - jembatan dari hidung ini menampilkan bentuk permukaan di beberapa orang, dan saya percaya kita semua memiliki struktur yang sama di sana, cukup banyak dari kami (seperti Asia) tidak menampilkannya. I guess that all that is neede is a little bend indicating the bone.(pic11) Saya menduga bahwa semua yang neede sedikit membungkuk menunjukkan tulang. (Pic11) 8. The nasolabial fold starts inside of the nostril and runs into the chin, together with the next wrinkle parallell to it. 8. The flip nasolabial dimulai dari dalam lubang hidung dan berjalan ke dagu, sama dengan yang berikutnya ke parallell kerut. Almost every single person on the planet shows something quite similar. Hampir setiap orang di planet ini menunjukkan sesuatu yang sangat mirip. (Although a few have the nasolabial fold hooking up a bit lower on the chin.) Toontje has a good example of nose modeling. http://64.233.189.132/translate_c?hl=id&sl=en&u=http://blenderartists.org/forum/showthread.php%3Ft%3D93651%26page%3D4&prev=/search%3Fq%3DSUB%2BD%2BModeling%26hl%3Did%26sa%3DX&usg=ALkJrhhnUUlPx3NOU-31bNNRxmi2BnmHAQ Unfortunately he doesn’t explain how he models the nose, but you can see the loops diagram. (Walaupun ada beberapa yang nasolabial flip hooking up sedikit di bawah dagu). Toontje contoh yang baik dari hidung modeling. http://64.233.189.132/translate_c?hl=id&sl=en&u=http://blenderartists.org/forum/showthread.php%3Ft%3D93651%26page%3D4&prev=/search%3Fq%3DSUB%2BD%2BModeling%26hl%3Did%26sa%3DX&usg=ALkJrhhnUUlPx3NOU-31bNNRxmi2BnmHAQ Sayangnya dia tidak ' t menjelaskan bagaimana dia model hidung, namun Anda dapat melihat diagram loops. The best nose I’ve seen. The best i've seen hidung. (pic12, 12b) (pic12, 12b) 9. The infraorbital fold should be present (except in some very young children and very fat people it's hidden.) .(pic3) (The fatty deposit on the cheek just below it grows and kind of merges with the smaller deposit just under the eye.) 9. The infraorbital flip harus hadir (kecuali di beberapa sangat muda dan anak-anak sangat lemak orang itu tersembunyi.). (Pic3) (The fatty deposit pada pipi tepat di bawah ini tumbuh dan jenis merges dengan hanya sejumlah kecil di bawah mata .) infraorbital fold - edges should run from the inside eye-corner down to the jaw-muscle, not 45 degrees loops to this direction as many do (for an extremely fat person it may differ.) infraorbital flip - ujung-ujungnya harus berjalan dari dalam mata-sudut rahang bawah ke-otot, tidak loops 45 derajat ke arah seperti ini banyak yang (untuk orang gemuk yang sangat mungkin berbeda.) Notice that this fold defines the eye socket and makes a fold line going from the eye (beak? Where the tears go from, I don’t know the correct term in English, help!). Pemberitahuan bahwa flip mendefinisikan rongga mata dan membuat flip baris terjadi dari mata (paruh? Mana yang dimulai dari air mata, saya tidak tahu istilah yang benar dalam bahasa Inggris, membantu!). (pic13) (pic13) 10. Wrinkles for frowning . 10. Keriput untuk frowning. Those are possible variants I’ve found. Yaitu kemungkinan varian I've ditemukan. I’m sure there are many more. Saya yakin masih banyak lagi. (pic14) (pic14) 11. 11. The final touch: add some assymetry. Sentuhan terakhir: tambahkan beberapa assymetry. The more bad character is, the more you may add. Karakter yang lebih buruk, semakin Anda bisa menambahkan. In real life beauty and symmetry are the signs of health, so the more symmetrical face is, the more we like it, but it's rare in real life, so you may add some to make it more believeable. Dalam kehidupan nyata keindahan dan simetri adalah tanda-tanda kesehatan, sehingga wajah lebih simetris, semakin kita seperti itu, tapi jarang terjadi di kehidupan nyata, sehingga Anda dapat menambahkan beberapa agar lebih believeable. But make it after rigging, blendshapes etc, with a blendshgape of any alternative to make setup easier. Tetapi setelah membuat laberang, blendshapes dll, dengan blendshgape dari setiap alternatif untuk membuat setup lebih mudah. Assymetrical characters are a pain to rig and skin. Assymetrical karakter yang sakit untuk memperlengkapi dan kulit. You even can collapre the stack with aplied blandshapes keepinf it rigged and skinned. Anda bahkan dapat collapre dengan susunan yang aplied blandshapes keepinf itu rigged dan dikuliti. As you see, all these details come from the knowledge of anatomy, and further improvements can be made with improving the knowledge of anatomy. Seperti yang Anda lihat, semua rincian ini datang dari pengetahuan tentang anatomi, dan perbaikan lebih lanjut dapat dilakukan dengan meningkatkan pengetahuan anatomi. I guess I will make “topology – body”, but I think it’s not as critical about animation, as we don’t often need muscles of the body deforming to the extent we need facial articulation. I guess saya akan membuat "topologi - tubuh", but I think it's not as kritis tentang animasi, seperti yang kita tidak perlu sering otot dari tubuh deforming ke mana kita harus facial artikulasi. But who knows, will wee. Tapi siapa tahu, akan wee. Of course for a lowpoly model the details must be simplified, but the rules are the same. Tentu saja untuk model lowpoly rincian harus disederhanakan, tetapi aturan-aturan yang sama. It’s not an excuse making a wrong topology for a lowpoly model.(pic15) Ini bukan alasan yang salah membuat topologi untuk lowpoly model. (Pic15) And here's an example of topology which, unfortunately, in my opinion, doesn't serve well for animation, though the form is beautiful. Dan disini adalah contoh topologi yang, sayangnya, menurut pendapat saya, tidak melayani dengan baik untuk animasi, namun bentuk yang indah. (pic16) (pic16) Maybe we could now invent a "perfect topology" applying these rules. Mungkin sekarang kita bisa menemukan sebuah "sempurna topologi" pada peraturan yang berlaku. A low-poly version and sub-d version would be nice. J rendah poly versi dan sub-d versi would be nice.
MEMBUAT ORANG


Mungkin topik ini tidak sama pentingnya dengan "topologi - kepala", selama sebagian besar apa yang anda butuhkan (imo) adalah pengetahuan anatomi dan bentuk yang baik, yang berjalan di luar format mendiskusikan rincian kunci untuk kepala animasi, yang tidak sebesar-besarnya. Though I share my concerns about the body modeling, please feel free adding yours. Walaupun berbagi kekhawatiran mengenai badan modeling, silakan menambahkan Anda. Drawing pools over the sketch is valid for body too. Menggambar denah renang atas berlaku untuk tubuh juga. It's better to model limbs from separate cyllinders, and then attaching them to prepared holes(having the same number of vertices). Lebih baik dari model limbah cyllinders terpisah, dan kemudian melampirkan mereka disiapkan lubang (yang sama memiliki jumlah vektor). There are 2 reasons for this: you start working from an idealised form without messing with normals which behave not well when you extrude. Ada 2 alasan untuk hal ini: anda mulai bekerja dari idealised bentuk messing tanpa normals dengan perilaku yang tidak baik jika anda menolak. And yet it takes longer to tweak such extrusions. Dan ia mengambil lagi untuk tweak seperti extrusions. The same about head: the muscles go diagonally on the neck, so you model them first (connecting from the back of an ear to the clavicles) and then connect the rest of polygons. Yang sama tentang kepala: otot yang pergi secara diagonal pada leher, sehingga Anda model pertama mereka (sambungan dari bagian belakang telinga ke clavicles) dan kemudian menghubungkan bagian polygons. Thus you don't have problems with diagonal geometry on the neck. Dengan demikian Anda tidak memiliki masalah dengan geometri diagonal pada leher. The number of sides for limbs should be even: 4, 6, 8 etc. The limbs are symmetrical in the end. Jumlah pihak untuk limbah harus bahkan: 4, 6, 8 dll adalah limbah yang simetris di bagian akhir. I don't see a point in avoiding 6-sided loops where fingers go close to each other. Saya tidak melihat titik menghindari 6-sided loops dimana jari pergi ke dekat satu sama lain. To me separating them by additional edges is a bit overwhelming. Bagi saya memisahkan mereka dengan tambahan Tepi agak sedikit banyak. Maybe there are some issues with skinning, I yet don't know. Mungkin ada beberapa masalah dengan skinning, namun saya tidak tahu. T-pose or 45 degrees pose? T-pose atau 45 derajat berpose? I guess 45 degrees pose for arms is better for skinning and it's harder to evaluate proportions in the t-pose and the volumes of muscles inevitably dissapear when using the t-pose after deforming to a more relaxed state, and yet you can have sharp enough corners of limbs(good, maintained form). I guess 45 derajat berpose untuk senjata yang lebih baik bagi skinning dan itu sulit untuk mengevaluasi proporsi di t-berpose dan volume otot yang pasti hilang ketika menggunakan t-berpose setelah deforming ke negara yang lebih santai, namun Anda dapat memiliki cukup tajam pelosok limbah (baik, dipelihara formulir). But it's easier to me to model hands in the t-pose. Tetapi saya lebih mudah untuk model tangan di t-berpose. So before skinning just rotate the hands to a 45 degrees pose. Jadi sebelum skinning hanya memutar tangan ke 45 derajat berpose. Yet maybe a little bent knees and elbows may be better for skiinning to maintain good forms for these positions. Namun mungkin sedikit tertunduk berlutut dan elbows mungkin akan lebih baik untuk skiinning ke bentuk yang baik untuk mempertahankan posisi ini. One more thing: the loops of legs. Satu hal lagi: di kaki loops. It's more logical to me to create a loop there going from one leg to another so it's closed on legs and is not affecting the upper body when you start adding more loops. Ada lebih logis kepada saya untuk membuat satu lingkaran itu terjadi dari satu kaki ke yang lain sehingga ditutup pada kaki dan tidak mempengaruhi atas tubuh saat Anda mulai menambahkan lebih loops. (pic1) (pic1) Pay attention to how edges flow together at the joints, specifically shoulders and hips. Perhatikan bagaimana Tepi mengalir bersama pada sendi, khususnya bahu dan hips. Make sure there aren’t any twisting edges or different number of segments, or too long faces. Pastikan tidak ada ujung-ujungnya berpilin atau jumlah segmen yang berbeda, atau terlalu panjang muka. Also the direction that edges flow at the bridge points is very important(pic2) Juga arah yang mengalir di pinggiran jembatan poin sangat penting (pic2) At the shoulder and hips the number of segments remains constant (no tri's) and every thing flows in the proper direction.(pic2) Di bahu dan hips jumlah segmen tetap konstan (no tri's) dan segala sesuatu mengalir dalam arah yang benar. (Pic2) And of course the number of segment smust be sufficient for limb defirmations. Dan tentu saja jumlah segmen smust sudah cukup untuk defirmations sayap.
buat pesawat


Shader the parsing plugin (ayslx) telah diperbarui untuk Aqsis 1.4.2 pada Mac OS X. Selain itu, sekarang naskah (useaqsisapp.tcl) yang membantu Aqsis menggunakan secara langsung dari app-struktur resmi Mac OS X Aqsis distribusi. Get the updated archive from the download page . Dapatkan Diperbaharui arsip dari halaman download. [12. [12. Dec 2008] Desember 2008]
Recent advances in the CVS-Head allow now a flawless export of the Marsrakete scene: Kemajuan baru di CVS-Kepala membolehkan kini flawless ekspor dari Marsrakete scene: to X3D: X3D ke: and even allow the X3D file to be re-imported to Ayam: dan bahkan memungkinkan X3D file yang akan diimpor kembali ke Ayam: . . [4. [4. Dec 2008] Desember 2008]
A bugfix release (Ayam 1.15.1) is available for download, get it now . A bugfix release (Ayam 1.15.1) tersedia untuk di-download, dapatkan sekarang. [27. [27. Nov 2008] Nov 2008]
The Win32 release executables have been updated for working import/export plugin support please redownload . Win32 executables rilis yang telah diperbarui untuk bekerja impor / ekspor mendukung plugin silahkan redownload. [23. [23. Nov 2008] Nov 2008]
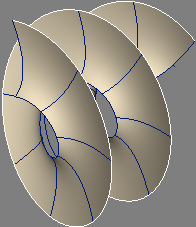
A new page shows off some parametric NURBS modelling examples . Baru beberapa halaman menunjukkan off parametric NURBS modelling contoh. [12. [12. Nov 2008] Nov 2008]
Ayam 1.15 has been released. Ayam 1,15 telah dirilis. Get it from the download page , see also the complete list of changes . Download dari halaman download, lihat juga melengkapi daftar perubahan. [4. [4. Nov 2008] Nov 2008]
Closed approximating curves now available for testing in the CVS-Head . Ditutup approximating Curves sekarang tersedia untuk pengujian di CVS-Head. [27. [27. Oct 2008] Oktober 2008]
The approximating curves, finally, work ok now: Approximating the Curves, akhirnya, pekerjaan ok sekarang: [20. [20. Aug 2008] Agustus 2008]
Recent advances in the CVS-Head include individual parameter sets for Script objects, that lead to the following screwy experiments: Kemajuan baru di CVS-Head termasuk individu untuk menentukan parameter Script benda, yang mengarah ke percobaan ganjil sebagai berikut:
Image 1: Gambar 1: The well known spiral Script object example with self defined parameter GUI was enhanced (a one line change), so that all parameters are now individual, then it was copied and the Radius parameters adapted. Spiral yang dikenal dengan Naskah obyek contoh diri ditentukan parameter GUI telah disempurnakan (satu baris perubahan), sehingga semua parameter sekarang individu, kemudian disalin dan diadaptasi Radius parameter. The two objects were simply put into a Skin tool object, and voila: a screw surface results. Needless to say, that one may now still change parameters of the screw surface easily by adapting parameters of the spiral Script objects with few mouse clicks. Dua objek yang cukup dimasukkan ke dalam sebuah alat Kulit objek, dan voila: a screw permukaan hasil. Perlu dikatakan, bahwa satu Mei sekarang masih mengubah parameter dari screw permukaan oleh mudah beradaptasi parameter dari spiral Script objek dengan beberapa klik mouse. Get the scene file for your own experiments. Mendapatkan pemandangan file untuk eksperimen Anda sendiri.
Image 2: Gambar 2: The spiral Script object defining the outer border of the screw surface was changed (again a one liner) for a sinusoidal offset in z direction resulting in a more interesting surface. Spiral Script obyek yang mendefinisikan luar batas sekrup permukaan telah diubah (satu lawan lagi) untuk di offset sinusoidal z arah sehingga permukaan yang lebih menarik. Get the scene file for your own experiments. Mendapatkan pemandangan file untuk eksperimen Anda sendiri.
Image 3: Gambar 3: The spiral Script object was copied a second time and the radius was adjusted again, furthermore a negative offset in z direction was added. Get the scene file for your own experiments. Spiral Script objek yang disalin untuk kedua kalinya dan radius disesuaikan lagi, selanjutnya offset negatif dalam arah z telah ditambahkan. Dapatkan scene file untuk eksperimen Anda sendiri. [24. [24. Jul 2008] Jul 2008]
Hotfix #1 for Ayam 1.14 has been released. Hotfix # 1 untuk Ayam 1,14 telah dirilis. Get it from the download page . Download dari halaman download. [9. [9. May 2008] Mei 2008]
If Ayam does not start on XP systems, download and install the Microsoft Visual C++ 2005 Redistributable Package (vcredist_x86.exe) . Ayam Jika tidak mulai pada sistem XP, download dan menginstal Microsoft Visual C + + 2005 Redistributable Package (vcredist_x86.exe).
New in the CVS-Head are now improved bevels and offset curves of open curves, 3D offset curves, more robust Gordon caps, true support for instances and tool object names in X3D export. Baru di CVS-Kepala telah ditingkatkan bevels dan kerugian yang buka Curves Curves, 3D offset Curves, Gordon caps lebih kuat, dukungan untuk kasus yang benar dan alat nama obyek di X3D ekspor. [18. [18. Apr 2008] Apr 2008]
The documentation has been improved a bit and put online in a new version. Dokumentasi telah meningkat sedikit dan dimasukkan secara online dalam versi baru.
The CVS-Head has now two scripts that switch Ayam to use the Gnome (zenity) or KDE (kdialog) file requesters instead of the native Tk ones. The CVS-Kepala telah dua skrip Ayam yang beralih menggunakan Gnome (zenity) atau KDE (kdialog) file requesters sebagai pengganti yang asli Tk. Furthermore, there is now a drag-and-drop plugin (aydnd.tcl) available that, with the help of tkdnd, allows to drag Ayam scene files (and other supported 3D scene files) onto the application window to load them. Selain itu, terdapat kini merupakan tarik-dan-drop plugin (aydnd.tcl) yang tersedia, dengan bantuan tkdnd, memungkinkan untuk menarik Ayam pemandangan file (dan lainnya didukung 3D scene file) ke jendela aplikasi untuk memuat mereka. Tkdnd currently works for X11 (XDND: KDE, Gnome) and Win32 (OLE). Tkdnd saat ini bekerja untuk X11 (XDND: KDE, Gnome) dan Win32 (Ole). [10. [10. Apr 2008] Apr 2008]
The Win32 release executables of Ayam 1.14 have been updated (for finally working custom object support). Rilis yang Win32 executables dari 1,14 Ayam telah diperbarui (akhirnya bekerja untuk mendukung objek kustom
Recent advances in the CVS-Head allow now a flawless export of the Marsrakete scene: Kemajuan baru di CVS-Kepala membolehkan kini flawless ekspor dari Marsrakete scene: to X3D: X3D ke: and even allow the X3D file to be re-imported to Ayam: dan bahkan memungkinkan X3D file yang akan diimpor kembali ke Ayam: . . [4. [4. Dec 2008] Desember 2008]
A bugfix release (Ayam 1.15.1) is available for download, get it now . A bugfix release (Ayam 1.15.1) tersedia untuk di-download, dapatkan sekarang. [27. [27. Nov 2008] Nov 2008]
The Win32 release executables have been updated for working import/export plugin support please redownload . Win32 executables rilis yang telah diperbarui untuk bekerja impor / ekspor mendukung plugin silahkan redownload. [23. [23. Nov 2008] Nov 2008]
A new page shows off some parametric NURBS modelling examples . Baru beberapa halaman menunjukkan off parametric NURBS modelling contoh. [12. [12. Nov 2008] Nov 2008]
Ayam 1.15 has been released. Ayam 1,15 telah dirilis. Get it from the download page , see also the complete list of changes . Download dari halaman download, lihat juga melengkapi daftar perubahan. [4. [4. Nov 2008] Nov 2008]
Closed approximating curves now available for testing in the CVS-Head . Ditutup approximating Curves sekarang tersedia untuk pengujian di CVS-Head. [27. [27. Oct 2008] Oktober 2008]
The approximating curves, finally, work ok now: Approximating the Curves, akhirnya, pekerjaan ok sekarang: [20. [20. Aug 2008] Agustus 2008]
Recent advances in the CVS-Head include individual parameter sets for Script objects, that lead to the following screwy experiments: Kemajuan baru di CVS-Head termasuk individu untuk menentukan parameter Script benda, yang mengarah ke percobaan ganjil sebagai berikut:
Image 1: Gambar 1: The well known spiral Script object example with self defined parameter GUI was enhanced (a one line change), so that all parameters are now individual, then it was copied and the Radius parameters adapted. Spiral yang dikenal dengan Naskah obyek contoh diri ditentukan parameter GUI telah disempurnakan (satu baris perubahan), sehingga semua parameter sekarang individu, kemudian disalin dan diadaptasi Radius parameter. The two objects were simply put into a Skin tool object, and voila: a screw surface results. Needless to say, that one may now still change parameters of the screw surface easily by adapting parameters of the spiral Script objects with few mouse clicks. Dua objek yang cukup dimasukkan ke dalam sebuah alat Kulit objek, dan voila: a screw permukaan hasil. Perlu dikatakan, bahwa satu Mei sekarang masih mengubah parameter dari screw permukaan oleh mudah beradaptasi parameter dari spiral Script objek dengan beberapa klik mouse. Get the scene file for your own experiments. Mendapatkan pemandangan file untuk eksperimen Anda sendiri.
Image 2: Gambar 2: The spiral Script object defining the outer border of the screw surface was changed (again a one liner) for a sinusoidal offset in z direction resulting in a more interesting surface. Spiral Script obyek yang mendefinisikan luar batas sekrup permukaan telah diubah (satu lawan lagi) untuk di offset sinusoidal z arah sehingga permukaan yang lebih menarik. Get the scene file for your own experiments. Mendapatkan pemandangan file untuk eksperimen Anda sendiri.
Image 3: Gambar 3: The spiral Script object was copied a second time and the radius was adjusted again, furthermore a negative offset in z direction was added. Get the scene file for your own experiments. Spiral Script objek yang disalin untuk kedua kalinya dan radius disesuaikan lagi, selanjutnya offset negatif dalam arah z telah ditambahkan. Dapatkan scene file untuk eksperimen Anda sendiri. [24. [24. Jul 2008] Jul 2008]
Hotfix #1 for Ayam 1.14 has been released. Hotfix # 1 untuk Ayam 1,14 telah dirilis. Get it from the download page . Download dari halaman download. [9. [9. May 2008] Mei 2008]
If Ayam does not start on XP systems, download and install the Microsoft Visual C++ 2005 Redistributable Package (vcredist_x86.exe) . Ayam Jika tidak mulai pada sistem XP, download dan menginstal Microsoft Visual C + + 2005 Redistributable Package (vcredist_x86.exe).
New in the CVS-Head are now improved bevels and offset curves of open curves, 3D offset curves, more robust Gordon caps, true support for instances and tool object names in X3D export. Baru di CVS-Kepala telah ditingkatkan bevels dan kerugian yang buka Curves Curves, 3D offset Curves, Gordon caps lebih kuat, dukungan untuk kasus yang benar dan alat nama obyek di X3D ekspor. [18. [18. Apr 2008] Apr 2008]
The documentation has been improved a bit and put online in a new version. Dokumentasi telah meningkat sedikit dan dimasukkan secara online dalam versi baru.
The CVS-Head has now two scripts that switch Ayam to use the Gnome (zenity) or KDE (kdialog) file requesters instead of the native Tk ones. The CVS-Kepala telah dua skrip Ayam yang beralih menggunakan Gnome (zenity) atau KDE (kdialog) file requesters sebagai pengganti yang asli Tk. Furthermore, there is now a drag-and-drop plugin (aydnd.tcl) available that, with the help of tkdnd, allows to drag Ayam scene files (and other supported 3D scene files) onto the application window to load them. Selain itu, terdapat kini merupakan tarik-dan-drop plugin (aydnd.tcl) yang tersedia, dengan bantuan tkdnd, memungkinkan untuk menarik Ayam pemandangan file (dan lainnya didukung 3D scene file) ke jendela aplikasi untuk memuat mereka. Tkdnd currently works for X11 (XDND: KDE, Gnome) and Win32 (OLE). Tkdnd saat ini bekerja untuk X11 (XDND: KDE, Gnome) dan Win32 (Ole). [10. [10. Apr 2008] Apr 2008]
The Win32 release executables of Ayam 1.14 have been updated (for finally working custom object support). Rilis yang Win32 executables dari 1,14 Ayam telah diperbarui (akhirnya bekerja untuk mendukung objek kustom
Langganan:
Komentar (Atom)
